Posts

How Designing Your Tray?


Decide what your tray will hold. First, think about what you intend to keep on your tray during baths and how much space each object will need. Make sure that you use a piece of lumber that is wide enough to hold everything. Allow extra space so nothing is sitting on the edge of the tray. For example: A 1” x 10” (2.5 x 25 cm) board should be wide enough to hold a book, candle, and glass with room to spare.


However, be aware that lumber sizes (such as 1” x 10”) refer to when the wood is freshly cut before it dries out and shrinks. So, if you have something wider than 10 inches that you want to place on your tray, you will need a wider board than a 1” x 10”. Choose how many layers of wood you will need. Decide between making a simple tray with no raised surfaces or one with holders for certain objects.


For the simplest tray, plan on using a single piece of lumber. Or, to minimize the risk of spilling stuff into the tub, purchase a second piece of equal size to create holders before attaching it to the base board. Alternately, you could rim the entire tray by screwing smaller pieces of lumber, like a 1” x 2” (2.5 x 5 cm), around all four edges of the base board instead of creating individual holders.


Line the tray with wood trim on each side 1 to 1.5 in (2.5 to 3.8 cm) wider than the tray to have an attractive raised lip. Use a piece of plexiglass as the base layer and a piece of wood the same size on top with holders cut into it. The plexiglass is easy to clean, waterproof, and it will protect the wood.


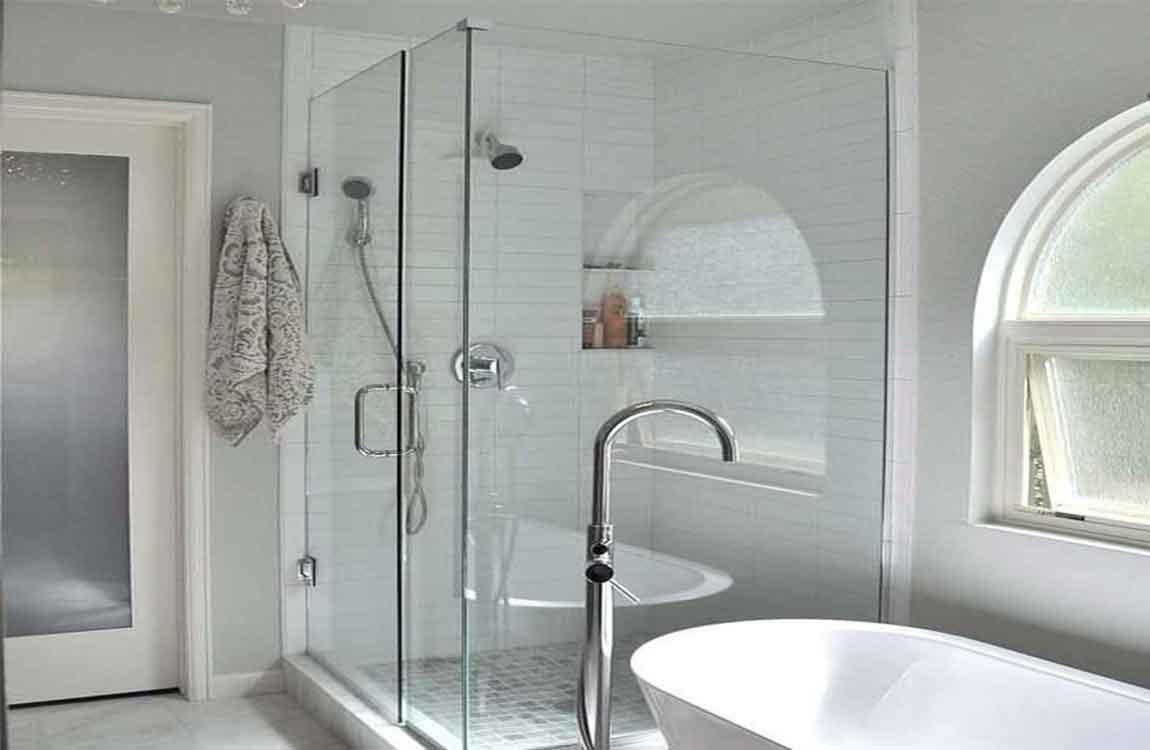
Measure your tub. Use a measuring tape to determine the width of your tub. Be sure to include the rim on either side, since this is where your tray will rest. Also double-check that the rim on either side is level with each other. Surround units (where the tub and the shower stall are all one unbroken piece) may incorporate designs without a level rim on the inside of the stall.

How to Tile a Shower?


A tiled shower adds beauty and durability and value to your home, and you can tile your shower all by yourself. There are several things you need to do to properly prepare a leak-proof shower. If you are tiling a shower for the first time, consult with a general contractor before starting the job. Use a hole saw with a carbide bit to cut the holes where the shower head and handles would come through.


Make the cement board flush with the tile lip of your shower pan by using shims behind the board to bring it out to the desired thickness. Make sure to use composite shims. Use 100% silicone caulk to seal the seams between the panels and then apply the silicone behind the board on the stud. Add some seam tape between the panels as well.


Lay the drywall. If using crown molding near the ceiling, lay down 12 to 18 inches (30.5 to 45.7 cm) of drywall instead of cement board. Nails used to fix the crown molding in place will not travel through the cement backer; you’ll need to use moisture-resistant drywall such as greenboard in order to take the nails and affix the molding.


Feather any edges with seam tape and thin set mortar where the backer board meets the wallboard. If there’s a gap between the backer board and the wallboard, you’ll want to use seam tape and then feather the gap with thin set mortar so that it appears as one continuous back. Remember that the seams must remain tight with gaps 3/16″ or smaller. Paint a water resistant primer over any areas you intend to tile.


After you’ve feathered the edges to remove the gap, apply a high quality water resistant exterior primer over the feathered wallboard and backer. Trowel some thin-set onto the back of the tile and spread it with a notched trowel. This process is called “back buttering.” Apply mortar to the backer board along with back buttering and then set the tiles on top of that. It’s a lot cleaner, too!

How Finishing up Tile a Shower?

Grout the tile. Mix up a batch of grout and let it rest for 5 to 7 minutes. Lightly wet the area you’ll be grouting with a damp sponge and dump a bit of grout onto the area. Use a rubber float to smooth it into the joints, attacking each joint at a diagonal angle. After 30-40 minutes (check the directions on the bag of grout) you want to wipe the excess grout with a damp sponge and a circular motion.


Keep wiping with a clean sponge until the tile is clear. The tiles may look a bit hazy even after wiping, so you may have to buff them with a clean sponge to get rid of this haze. Let the grout cure for approximately 3 days before sealing. Then, seal the grout. Run a thin bead of liquid grout or aerosol grout sealer onto the grout line and wipe away.


Let dry and then test its water resistance by dropping water onto the sealed grout. Correctly sealed grout will cause the water to bead up on top of it. Caulk any needed areas. Make sure to use a grout caulk to match the colors. As you caulk, remember to pull the caulk gun relatively quickly across the joint.


Most amateurs caulk too slow and end up dropping too much caulk down on the joint. Other things to remember: Keep the tip angled as you run the bead along the joint. Match the speed with which you pull the caulk gun trigger with the rate at which you pull the gun along the joint. You don’t want to be pulling the gun fast but triggering slowly, or vice versa.


After applying the bead of caulk, “bed” it by running a damp finger across the bead with light pressure. Make sure that your grout chalk matches the grout. Let the caulk dry and redo it if you are not happy with the results. Let the tile set for 48 hours. This will make sure that the mortar has adhered properly to both the tile backing and the cement board backer.

How to Fix a Chipped Bathtub


Fixing a chipped bathtub is a do-it-yourself project that will save you from hiring an expensive professional. Whether your tub just has a few small chips, or it is badly damaged and needs to be refinished, these are both projects that you will find kits for at your local home improvement store. With a little elbow greasy, your tub will look like new in just a matter of days!


It’s easiest to start with a small amount of epoxy and add more layers than it is to put too much on and remove it. Let the epoxy dry, then sand down the surface with 400-600 grit sandpaper. Follow the directions on your epoxy kit to let it fully dry. Gently sand the surface with 400- or 600-grit sandpaper until it feels smooth like the rest of the tub.


Some epoxy will set in 2-3 hours, at which point you can sand. Other kits may advise you to wait up to 24 hours before sanding. You can add another layer of epoxy after sanding if you can still feel the chip. Then repeat the process. Your refinishing kit should come with sandpaper to use. If your kit didn’t come with sandpaper, then start with 400-grit sandpaper and work your way up to 2000-grit.


Increase the grit of the sandpaper in increments of 200 until you reach 1000-grit sandpaper, then go up in increments of 500 until you end using 2000-grit sandpaper. Repair any chips or cracks in the tub with a 2-component epoxy chip repair kit. Follow the instructions to mix the two parts of the epoxy in a small tray.


Use a small brush, spatula, or the bottom end of a matchstick to apply thin layers of epoxy to any chips. Wait 2-3 hours until the epoxy dries and sand the patches down with 2000-grit sandpaper to match the finish of the rest of the tub. This will ensure that the tub has no chips or cracks and seal the surface before you apply the new finish.

How Preventing Future Growth?


Fix any leaks you can see. If a leak is causing the problem, it’s time to take care of that! Replace leaky faucet heads, for instance, or if the leak is more than you can handle, call in a professional to find and fix the leak. If you don’t fix the leak, the mold will just return.


Spray the area down with vinegar after every shower. To help prevent the mold from coming back, keep a spray bottle in your bathroom. Then, spray down the walls and tub after you get done with your shower. The vinegar will help kill the mold spores. If the smell bothers you, add a few drops of essential oil, such as peppermint, citrus, or tea tree oil, to help cover up the scent.


Air out the bathroom after you shower. If you have an exhaust fan, use it. If you don’t, make sure to keep the door to the bathroom open after you shower so the air can dry out. Too much humidity in a small space can lead to mold. If you don’t have an exhaust fan, try placing a fan in the door to blow the air into the rest of your home.


Clean the bathroom once a week. Use a disinfecting cleaner to go over your shower and scrub it down. Pick a day to do it each week to make it easier to remember, and set up a reminder if you forget. Make sure to change out your sponge or cleaning brush regularly, as it can grow mold, too.


Use your air conditioning in the summer to keep the humidity low. Pulling humidity out of the air is one of your AC’s main jobs, so you should run it in the summer when it’s humid out. If you don’t have an AC, try using a dehumidifier to reduce the humidity. If possible, keep the humidity in your home under 60%.

How Using a Cleaning Cream Clean Shower Screen?


Buy a commercial cleaning cream. It doesn’t need to be expensive—a generic brand should suffice. Find a shower cream anywhere that sells cleaning supplies: home-and-garden stores, bathroom-supply stores, and some drugstores. Squeeze a bit into your hand or a cloth and spread it over the whole surface of the screen.


Don’t worry about ruining the surface—the cream doesn’t harm glass. Rub the cream all over the glass, and don’t feel that you need to rub too hard. If you have a marble shower, you should keep the cleaning cream away from the marble. Grab a damp/wet cloth and wipe off the cream. The cream will froth, and it might take a few attempts to wipe it all off—but you don’t need to scrub!


Dry the screen. Use a clean, dry towel (cloth or paper) to gently dry the shower screen so that the end result is evenly clean. Repeat the process for the tiles the tiles. If you’re worried about the surface of your tiles, you can put the cream onto a cloth instead, but it will take longer and more persistence.


Spray your shower screen with window cleaner and wipe with a squeegee. You can use any commercial window cleaner—for example, Windex. If you do not have a squeegee, consider using a sponge. First, rinse the surface. Get rid of any dirt that has collected on the surface of the shower screen. You can run water from shower over the screen to wash away dirt, or you can use an external water source.


Spray window cleaner on the surface, then lightly wipe it down with a paper towel. Squeegee the surface. Spray on another layer of your preferred window-cleaning solution, then go over the surface with the squeegee until it is perfectly clean. If there are any marks left after the squeegee, go over the surface with a dry paper towel. Don’t be afraid to scrub stubborn spots.

How to Fix a Bathroom Faucet?

Most of the time, a problem with a bathroom faucet involves a leak. Usually, faucet leaks are caused by worn washers or seats in the faucet assembly and these are easily replaced. There are several types of faucets, some that no longer use washers to create a seal in the assembly. Make sure that you recognize the type of  faucet that you have before attempting to fix a leak because different assembly parts and tools might be needed. In some cases, you might need to purchase a faucet repair kit that contains special tools for fixing specific faucets. In any case, fixing a bathroom faucet can be done in a matter of minutes with just a few replacement parts.

Locate the water valves under the sink and switch them off. Cover the sink drain to prevent parts from getting lost. Pry off the cap from the sink handle. Remove the screw that holds the handle on. Remove the faucet handle. Unscrew the nut. Unscrew the stem. Coat the new washer with plumber’s grease. Replace the seat washer. Remove the stem from the packing nut. Coat a new O-ring with plumber’s grease. Replace the O-ring. Reassemble the faucet.

Ball-Type Faucet. Purchase a faucet repair kit for this type of faucet. Remove the handle by unscrewing the set screw and lifting the handle. Remove the cap. Remove the collar. Loosen the cam and lift it out. Remove the seals and springs from inside the faucet with a needle-nose pliers. Remove the old O-rings. Roll on the new, greased O-rings. Install new springs. Install new valve seats and washers. Reassemble the faucet.

Cartridge Faucet. Remove cap. Remove the screw on the handle. Remove the handle by tilting it toward the back of the sink. Remove the retaining clip (if present) with a needle-nose pliers. Pull cartridge up and out. Cut off the O-rings with a utility knife. Install new, greased O-rings. Reassemble the faucet.

Ceramic-Disk Faucet. Locate the handle set screw and remove. Lift the handle off. Remove the cap. Remove the cylinder mounting screws. Lift the cylinder out. Remove the seals from the cylinder. Clean the cylinder openings with vinegar and rinse. Replace the seals. Reassemble the faucet. Place the handle to “on” and turn on the water very slowly so as to not damage the ceramic disk.

How to Use Circulating Light in a Black Bathroom?

Featuring a bit of black in your bathroom decor can add class and excitement to the room’s ambiance. Black paint, for instance, can be used for quick, striking renovations. There are other ways to incorporate black in the bathroom as well, including reflective black tile. In fact, using mirrors and features to help circulate light will make a bathroom with black features stay both beautiful and inviting.

Use reflective material for black walls. If you’re envisioning a bathroom with black walls, it’s important to use a material that will reflect light and create an inviting, comfortable atmosphere. For instance, walls of black tile will be far more enlivening than walls that are simply painted black. Either porcelain or ceramic tiles will work. For an even cleaner, sleeker look, consider using sheets of black glass to wall your bathroom.

Avoid using too much black. Imagine a room in which everything is black. It would simply not be a comfortable room. Psychologically, in fact, too much black can cause occupants to feel claustrophobic. Further, black absorbs light, so too much black can make a room dark and unwelcoming.

Use shiny fixtures and accents. White bathroom fixtures aren’t the only way to add light and shimmer to a darkly-colored bathroom. Incorporate plenty of glass and metal as well. The more reflective the material, the better. Chrome faucets and glass handles, for instance, can add a vibrant feel to bathroom with a lot of black.

A variety of materials can also help fight the tendency for darker rooms to feel a bit dreary at times. Feature mirrors prominently. One of the best ways to maximize light, especially in a dark room, with with a large mirror. A wide sink mirror, especially with built-in lighting, is ideal. Another option is adding a floor-length mirror to the bathroom, or replacing cabinet doors with swing-out mirrors.

How to Incorporating Other Features in a Bathroom?

Contrast black with white. The drama that a black bathroom can offer is most prevalent when there is a healthy amount of white to provide some striking contrast. The brighter the white the better. Further, classic white fixtures, such as the sink and tub, will not only provide great contrast to black, but will reflect light well.

Another good way to add contrast to dark walls is by painting the ceiling white. This will also help the bathroom feel cleaner and more open. Incorporate texture. If material costs are not a factor, consider going with black marble walls. The variously-colored veins that run through marble will add subtle and appealing contrast. Another way to add texture along with a touch of black is by staining any wood features with an ebony stain.

Dark, textured materials create shadows within a 2-D surface, which imbues a room with character in class. Opt for black flooring. A great alternative to black walls is black flooring. This is likely the best option in bathrooms do not have windows. The classic example would be black, reflective tiles, perhaps held in place with a bright white grout.

Checkered white and black tiles is also popular, and for good reason – it adds both class and enjoyment to a bathroom. Outfit the bathroom with black items. There are plenty of specific ways to add an extra splash of black to the bathroom. For instance, a dark black floor mat will look especially good on a light colored floor surrounded by black walls. If only some of your walls or your cabinets will be black, consider hanging photos in black frames.

Whatever you choose, try to feature black accessories in locations that will stand out. For instance, store folded black towels on metal or glass shelves, as opposed to hanging them in front of a black wall.

How to Replace a Bathroom Faucet?

Install the gasket. The gasket is a rubber or plastic piece that sits between the faucet and the sink to ensure a proper seal and prevent leaks. Fit the gasket over the bottom of the faucet, matching the holes in the gasket with the tailpipes and valves on the faucet. Plastic gaskets generally snap onto the faucet, so be sure to seat them properly so the faucet is tightly sealed. If your faucet didn’t come with a gasket, you’ll need to apply sealant or plumber’s putty before installing the faucet. Follow the manufacturer’s directions and lay down a thin layer of sealant or putty right before you put in the faucet.

Wrap all the threads with plumber’s tape. Plumber’s tape is designed to lubricate fittings and create a better seal between components. Wrap the end of the faucet tailpipes with a layer of plumber’s tape, making sure the tape doesn’t extend beyond the end of the pipe. The tailpipes are where the water supply hose will attach to the faucet, and the tape will prevent leaks.

Insert the new faucet. Hold the faucet in both hands and carefully set it into the mounting holes. Match the tailpipes and valves with the proper holes, and place the faucet into position. Once the faucet is in the mounting holes, insert a washer over each tailpipe, and then twist on the nuts by hand. To tighten the nuts, turn them to the right (clockwise). When you’ve tightened the nuts by hand, finish tightening them by turning them another quarter turn with the adjustable wrench if necessary. Avoid tightening the nuts any further, or you could damage the sink.

Attach the water supply hoses. Start by attaching the hoses to the faucet first. Attach each hose to the tailpipe of the faucet, and then tighten the nut by hand. To finish tightening the nuts, use the basin wrench to turn each nut a quarter turn to the right (clockwise). Once the hoses are attached to the new faucet, reattach them to the water supply. Turn the nuts by hand to the right (clockwise), then tighten them the rest of the way with the adjustable wrench.

If you are attaching the supply lines to copper pipes with threaded fittings, hold the copper pipe securely while connecting the supply lines to ensure the pipes don’t twist or break. Turn on the water and test the faucet. When everything is connected and tightened, turn the water back on by turning the shutoff valve to the left (counterclockwise). Then turn on the taps to flush out the new faucet. When the water is running, check for leaks and drips. To flush the faucet, simply let the hot and cold water run for 1 to 2 minutes.